
Mini Tuna Melt Pita Pockets Recipe: A Quick and Healthy Meal Option
Tuna has long been a staple in kitchens around the world, celebrated for its versatility and nutritional profile. As a lean protein source, it can easily fit into a variety of dietary preferences, making it a go-to ingredient for many home cooks. Whether served in a salad, sandwich, or casserole, tuna offers a satisfying flavor that complements an array of other ingredients. Among the myriad of ways to enjoy tuna, Mini Tuna Melt Pita Pockets stand out as a particularly convenient and scrumptious meal option, perfect for those busy days when time is of the essence.
The Mini Tuna Melt Pita Pockets are not just a quick fix; they are also a health-conscious choice. By utilizing whole wheat pita bread, fresh vegetables, and quality tuna, these pockets deliver a balanced meal packed with essential nutrients. Whole wheat pita adds fiber to the equation, aiding in digestion and promoting satiety. Fresh vegetables such as celery and red onion contribute vitamins and minerals while providing a satisfying crunch that enhances the overall texture of the dish. With just a few simple ingredients and minimal preparation time, these pita pockets can easily become a favorite in any household, catering to the tastes of both adults and kids alike.
Understanding Tuna as a Healthy Protein Option
When it comes to nutritional value, tuna shines brightly. This fish is not only high in protein, making it an ideal choice for muscle repair and growth, but it is also rich in omega-3 fatty acids, which are essential for heart health and brain function. These healthy fats can help reduce inflammation and lower the risk of chronic diseases, making tuna a worthy addition to any diet.
When considering tuna for your Mini Tuna Melt Pita Pockets, you may come across two main types: canned tuna and fresh tuna. Canned tuna is often more accessible and affordable, making it a convenient option for busy families. It generally comes in two varieties: chunk light and solid white, with chunk light being more economical and solid white offering a firmer texture and richer flavor. Fresh tuna, while typically more expensive, can provide a superior taste experience and is often preferred by gourmet chefs. However, regardless of the type you choose, be mindful of sustainability. Opting for brands that adhere to sustainable fishing practices ensures that your seafood choices are both healthy for you and kind to the environment.
Key Ingredients Breakdown
The success of the Mini Tuna Melt Pita Pockets lies in the quality of its ingredients. Let’s take a closer look at the main components that make this dish both delicious and nutritious.
– Tuna: As mentioned, the choice between canned and fresh tuna can affect the flavor and texture of your dish. For convenience, canned tuna is often the best option, but be sure to select a brand that uses sustainable fishing methods. Look for tuna packed in water for a lower-calorie option, or in olive oil for a richer flavor.
– Mayonnaise: Traditional recipes often call for mayonnaise to bind the ingredients together and add creaminess. However, you can lighten the meal by using Greek yogurt or avocado as healthier alternatives. Greek yogurt is lower in calories and provides additional protein, while avocado imparts a creamy texture along with healthy fats.
– Dijon Mustard: This ingredient adds a zesty kick to the filling, enhancing the overall flavor profile. If you don’t have Dijon mustard on hand, yellow mustard or spicy brown mustard can serve as suitable substitutes.
– Fresh Lemon Juice: A splash of fresh lemon juice brightens the flavors and balances the richness of the mayonnaise or yogurt. Besides enhancing taste, lemon juice offers vitamin C and antioxidants, contributing to the health benefits of the dish.
– Vegetables: Crunchy vegetables like celery and red onion not only add texture but also pack a nutritional punch. Celery is low in calories and high in fiber, while red onion contains antioxidants and anti-inflammatory properties. You can customize the vegetable mix to include your favorites, such as diced bell peppers or shredded carrots.
– Cheese: A classic tuna melt wouldn’t be complete without cheese. When choosing the right cheese, consider varieties that melt well, such as cheddar, Monterey Jack, or mozzarella. For a more gourmet twist, you might try Gruyère or a smoked cheese for added depth of flavor.
– Optional Additions: To elevate your Mini Tuna Melt Pita Pockets, consider incorporating spicy elements like diced jalapeños or a dash of hot sauce. These additions can bring a delightful heat that contrasts beautifully with the creamy filling, appealing to those who enjoy a bit of spice in their meals.
Step-by-Step Preparation Guide
Now that we have an understanding of the ingredients, let’s delve into the preparation process for these Mini Tuna Melt Pita Pockets. The steps are straightforward, ensuring that even beginner cooks can whip up this dish with ease.
1. Gather Ingredients: Start by collecting all your ingredients. You’ll need canned tuna, mayonnaise or its alternative, Dijon mustard, fresh lemon juice, diced vegetables (celery and red onion), cheese, and whole wheat pita bread.
2. Prepare the Tuna Filling: In a mixing bowl, combine the drained tuna with mayonnaise (or your chosen alternative), Dijon mustard, and lemon juice. Stir until well combined, ensuring the tuna is evenly coated.
3. Add Vegetables: Fold in the chopped celery and red onion. You can adjust the amounts according to your preference for crunch and flavor intensity.
4. Incorporate Cheese: Mix in your choice of cheese, reserving some for topping later. This will help create that classic melty texture when baked.
5. Fill the Pita Pockets: Carefully open each whole wheat pita pocket and spoon the tuna mixture inside, distributing it evenly.
6. Top with Cheese: Place the filled pita pockets on a baking sheet and sprinkle the reserved cheese on top of each one.
7. Bake: Preheat your oven to 350°F (175°C) and bake the pita pockets until the cheese is melted and bubbly, usually about 10-15 minutes.
These initial steps set the stage for a delightful meal that balances convenience and nutrition, making it an excellent choice for lunch or dinner. Stay tuned for the next part of this article, where we will explore additional serving suggestions, variations, and tips to make your Mini Tuna Melt Pita Pockets even more irresistible.
{{image_2}}
Detailed Instructions on Preparing the Tuna Mixture
To create the perfect tuna mixture for your Mini Tuna Melt Pita Pockets, start by draining your canned tuna thoroughly. Excess moisture can lead to a soggy filling, which detracts from the overall experience. Next, transfer the tuna to a mixing bowl. Use a fork to break it apart into smaller pieces, ensuring it blends well with the other ingredients.
Ingredients for the Tuna Mixture:
– 1 can (5 oz) of tuna, drained
– 2 tablespoons mayonnaise (or Greek yogurt for a lighter option)
– 1 teaspoon Dijon mustard
– 1 tablespoon lemon juice
– Salt and pepper to taste
– Optional: 1 tablespoon capers or chopped pickles for added flavor
Combine the mayonnaise, Dijon mustard, and lemon juice in a separate small bowl. This mixture not only adds creaminess to the tuna but also enhances the flavor profile. Pour this mixture over the tuna and stir gently until everything is well incorporated.
Importance of Texture and Flavor Balance
Achieving the right balance of texture and flavor is crucial for your Mini Tuna Melt Pita Pockets. The tuna should be flaky yet moist, while the addition of mayonnaise and mustard contributes creaminess. To enhance the flavor further, consider adding finely chopped herbs, such as dill or parsley, which will bring freshness to the dish.
Incorporating Vegetables: Techniques for Proper Chopping and Mixing
Vegetables add not only flavor but also crunch and nutrition to your tuna mixture. Here are some great options:
– Celery: Adds a satisfying crunch. Dice finely to ensure even distribution throughout the filling.
– Red onion: Provides a sharp flavor contrast. Mince it finely to avoid overpowering the tuna.
– Bell peppers: Use a mix of colors for visual appeal. Chop them into small pieces for a balanced texture.
Mixing the Vegetables
Once your vegetables are prepped, fold them gently into the tuna mixture. This technique preserves the texture of both the tuna and the vegetables, ensuring that every bite is packed with flavor.
Cheese Integration: Tips for Ensuring Even Distribution
Cheese is a key element in the Mini Tuna Melt Pita Pockets, bringing richness and a delightful gooey texture when melted. Here are some cheese options you can use:
– Cheddar: A classic choice known for its sharp flavor.
– Monterey Jack: Offers a mild flavor and melts beautifully.
– Swiss: Adds a nutty profile complementing the tuna.
Incorporating Cheese into the Mixture
To ensure even cheese distribution, shred the cheese rather than using slices. Fold the shredded cheese into the tuna mixture just before filling the pita. This technique allows the cheese to integrate seamlessly, ensuring that every bite is deliciously cheesy.
Preparing the Pita Pockets: Best Practices for Cutting and Filling
For the best results, choose whole wheat pita pockets for added fiber and nutrition. To prepare them:
1. Cutting the Pita: Use a sharp knife to slice each pita in half, creating a pocket. Be gentle to avoid tearing the bread.
2. Filling the Pita: Open the pita gently and spoon the tuna mixture inside. Aim to fill each pocket generously but avoid overstuffing to prevent tearing.
Grilling Tips: Achieving the Perfect Melt and Crispiness
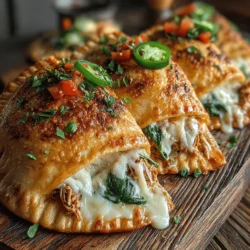
Grilling your Mini Tuna Melt Pita Pockets is where the magic happens. Here are some tips for achieving the perfect melt and crispiness:
1. Use Medium Heat: Preheat your grill or skillet to medium heat. This allows the cheese to melt without burning the pita.
2. Butter the Outside: Lightly butter the outside of each pita pocket for added flavor and to help achieve a golden brown exterior.
3. Grill Time: Place the filled pita pockets on the grill and cook for about 3-4 minutes on each side, or until the cheese is melted and the pita is crispy. Keep an eye on them to prevent burning.
Serving Suggestions: Presentation Tips for an Appealing Dish
Presentation can elevate your Mini Tuna Melt Pita Pockets from simple to stunning. Here are some serving suggestions:
– Garnish with Fresh Herbs: Sprinkle some chopped parsley or dill on top for a fresh touch.
– Serve with a Side Salad: A light green salad or coleslaw complements the richness of the tuna melts and adds a refreshing crunch.
– Pair with Dipping Sauces: Consider offering a side of extra mayonnaise, sriracha, or tzatziki for dipping.
Nutritional Analysis of Mini Tuna Melt Pita Pockets
Understanding the nutritional profile of your Mini Tuna Melt Pita Pockets can help you appreciate the health benefits of this meal.
Breakdown of Calories, Protein, Fats, and Carbohydrates per Serving
– Calories: Approximately 250-300 calories per serving (1 pocket)
– Protein: About 20 grams, making it a great source of lean protein
– Fats: Roughly 10-15 grams, depending on the amount of mayonnaise and cheese used
– Carbohydrates: Around 30 grams, primarily from the whole wheat pita
Benefits of Whole Wheat Pita vs. Regular Pita
Whole wheat pita offers more fiber and nutrients than regular pita. Fiber is essential for digestive health and helps keep you full longer. Additionally, whole grains have been linked to lower risks of chronic diseases.
Discussion of How This Recipe Fits into Various Dietary Preferences
Mini Tuna Melt Pita Pockets can easily fit into various dietary preferences:
– Low-Carb: Use lettuce wraps instead of pita for a low-carb version.
– High-Protein: With its tuna and cheese, this recipe is naturally high in protein, perfect for muscle maintenance.
– Gluten-Free: Substitute traditional pita with gluten-free options available in stores.
Versatility of the Recipe
One of the best aspects of Mini Tuna Melt Pita Pockets is their versatility. You can easily adapt the recipe to suit your tastes and dietary needs.
Suggestions for Ingredient Substitutions
– Cheese Variations: Try different cheeses like feta for a tangy flavor or pepper jack for some heat.
– Vegetable Swaps: Incorporate different vegetables such as shredded carrots, zucchini, or corn for a unique twist.
Ideas for Serving Sizes and Portion Adjustments
This recipe can be scaled up or down depending on your needs. For parties, consider making mini versions using smaller pita pockets or serving the tuna mixture as a dip with crackers and vegetable sticks.
How to Adapt the Recipe for Different Occasions
– Snacks: Serve the tuna mixture as a dip with raw vegetables.
– Lunches: Pack pita pockets in lunch boxes for a satisfying meal.
– Parties: Create a platter of assorted fillings for a fun build-your-own tuna melt station.
Possible Pairings
To complement your Mini Tuna Melt Pita Pockets, consider these pairing options:
– Sides: Serve with vegetable chips, sweet potato fries, or a light soup for a complete meal.
– Drinks: Pair with iced tea, lemonade, or a light beer for a refreshing combination.
Conclusion
In summary, Mini Tuna Melt Pita Pockets are not only a nutritious and quick meal option but also a canvas for your culinary creativity. With their ease of preparation and customization, these pita pockets can cater to a wide range of tastes and dietary preferences.
Whether you’re looking to whip up a satisfying lunch or a fun snack, this recipe delivers on flavor, nutrition, and versatility. We encourage you to try making these delicious pockets and experiment with variations that suit your personal preferences. By incorporating healthy recipes like this into your daily meal planning, you can enjoy delicious meals while maintaining a balanced diet.