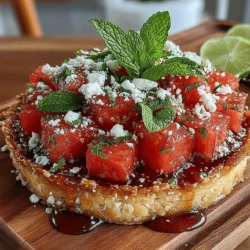
Refreshing Watermelon No-Bake Galette Recipe
As the warm sun shines down and the days stretch longer, summer presents a perfect opportunity to indulge in light, refreshing desserts. One such delightful treat is the Refreshing Watermelon No-Bake Galette. This dessert not only captures the essence of the season but also offers a unique twist on traditional galettes, making it an ideal choice for those warm afternoons or balmy evenings spent with family and friends.
The appeal of no-bake recipes is particularly strong during the summer months. With temperatures rising, the last thing anyone wants to do is turn on the oven and heat up the kitchen. No-bake desserts, like this watermelon galette, allow you to whip up something delicious without breaking a sweat. The use of fresh, healthy ingredients not only contributes to a light and flavorful dish but also makes it a guilt-free indulgence. Whether you’re hosting a picnic, attending a casual gathering, or simply enjoying a family meal at home, this galette is sure to impress.
Understanding the Galette
Before diving into the recipe, it’s essential to understand what a galette is. A galette is a type of rustic pastry that is known for its freeform shape and simplicity. Unlike traditional pies, which are typically encased in a rigid crust, galettes embrace a more laid-back approach, with the edges folded over the filling in a casual, artistic manner. This rustic charm not only makes them visually appealing but also adds to their charm as a no-fuss dessert.
No-bake galettes are particularly suited for warm climates, as they require no baking time and can be prepared quickly. They offer a refreshing alternative to heavier baked goods, allowing the natural flavors of the ingredients to shine through. The beauty of galettes lies in their versatility; you can experiment with various fillings, from fruits to creams, depending on what’s in season or what flavors you prefer.
Ingredients Overview
The foundation of any great galette lies in its crust, and our Refreshing Watermelon No-Bake Galette is no exception. For this recipe, we will utilize a combination of almond flour and coconut flour to create a gluten-free crust that provides both texture and flavor. These flours are not only gluten-free but also packed with nutrients, making them great alternatives to traditional wheat flour.
Coconut oil plays a crucial role in this recipe, serving as a healthier fat option that adds richness while keeping the crust dairy-free. To sweeten the crust naturally, we’ll use maple syrup, which adds a hint of sweetness without overpowering the other flavors.
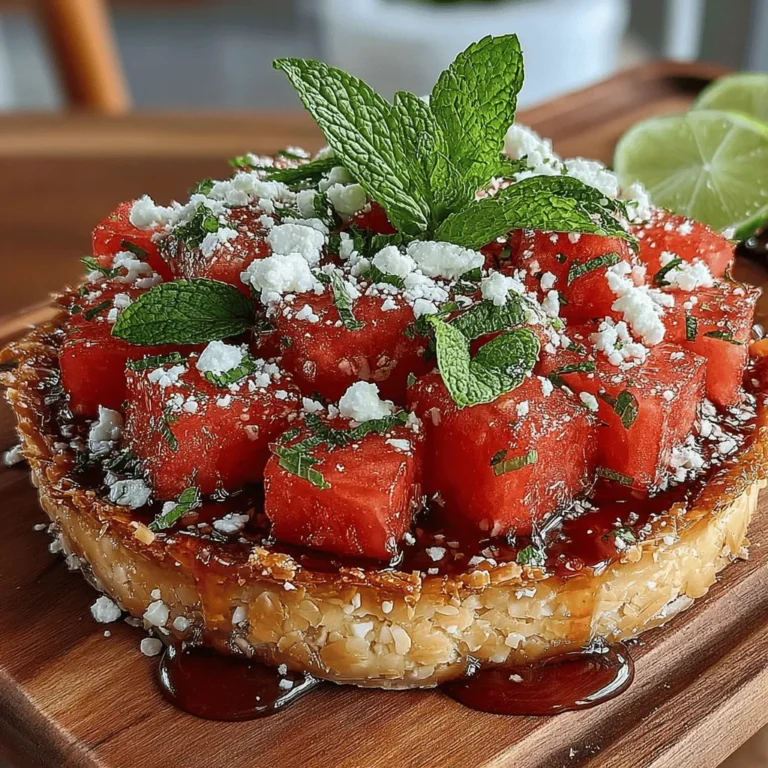
The watermelon filling is the star of this galette, and for good reason. Watermelon is not only a quintessential summer fruit, but it’s also incredibly hydrating, making it perfect for warm weather. Its natural sweetness pairs beautifully with the tartness of lime juice, which adds a refreshing zing to the dish. Fresh mint leaves bring an aromatic quality that elevates the overall flavor profile, creating a delightful contrast to the sweetness of the watermelon.
While the filling is already delicious on its own, you can take this galette to the next level with optional garnishes. Crumbled feta cheese adds a creamy, salty element that complements the sweetness of the watermelon, while additional mint leaves provide a pop of color and freshness.
Step-by-Step Instructions for Preparing the Galette
Preparing the Crust
To get started, we need to prepare the crust. Begin by gathering your almond flour, coconut flour, coconut oil, and maple syrup. In a mixing bowl, combine the almond flour and coconut flour, ensuring they are well mixed to create a uniform texture. The combination of these two flours is crucial; almond flour adds moisture and a subtle nutty flavor, while coconut flour contributes to the structure of the crust.
Next, add the melted coconut oil and maple syrup to the flour mixture. Use a fork or your hands to combine the ingredients until they form a dough. It’s important to achieve the right consistency here; the dough should be slightly sticky but manageable. If it feels too dry, you can add a teaspoon of water at a time until the desired consistency is reached.
Shaping and Chilling the Crust
Once your dough is prepared, it’s time to shape it into a rustic galette. On a piece of parchment paper, begin by pressing the dough into a flat circle, about ¼ inch thick. The edges don’t need to be perfect; in fact, the imperfection adds to the rustic charm of the galette.
After shaping the dough, carefully transfer it to a pie or tart pan, or simply keep it on the parchment paper if you plan to serve it directly on it. Place the crust in the refrigerator to chill for at least 30 minutes. Chilling the crust helps it firm up, making it easier to handle when you’re ready to add the filling.
While the crust chills, you can prepare the watermelon filling, which will be outlined in the next part of the article. The refreshing combination of watermelon, lime juice, and mint will soon transform this simple crust into a stunning centerpiece for your summer dessert table. Stay tuned for the next steps as we assemble and finish our Refreshing Watermelon No-Bake Galette.
{{image_2}}
How Chilling Affects the Final Texture of the Crust
Chilling the crust is a crucial step in ensuring your Refreshing Watermelon No-Bake Galette has the perfect texture. When the crust is chilled, the fat in the almond and coconut mixture solidifies, which helps to create a firmer structure. This step prevents the crust from becoming soggy once the watermelon filling is added. A well-chilled crust will hold its shape beautifully, providing a delightful contrast to the juicy watermelon filling.
Preparing the Watermelon Filling
The watermelon filling is the star of this galette, and preparing it properly enhances its flavor and texture. Start by selecting a ripe, sweet watermelon. Cut it into manageable cubes and remove any seeds. Next, place the watermelon cubes in a large bowl and sprinkle them with a bit of sugar or your preferred sweetener. This step is essential: allowing the watermelon to sit with the sweeteners for about 15-30 minutes lets the sugars draw out the natural juices, intensifying the flavor and ensuring a syrupy consistency that pairs perfectly with the crust.
Tips for Selecting the Perfect Watermelon
When it comes to choosing the best watermelon, look for a few key indicators:
– Weight: A ripe watermelon will feel heavy for its size, indicating it’s full of water and juice.
– Color: Look for a deep green color with a creamy yellow spot where it rested on the ground. This spot indicates ripeness.
– Sound: Give the watermelon a tap. A ripe one will produce a deep, hollow sound, while an under-ripe one will sound dull.
– Shape: Select a symmetrical watermelon without dents or irregularities, as these can indicate uneven ripening.
Assembling the Galette
Once your crust is chilled and your watermelon filling is ready, it’s time to assemble the galette. Begin by carefully transferring the chilled crust to a lined baking sheet or a large serving platter. You can use a spatula or your hands to lift the crust, but be gentle to avoid breaking it.
Techniques for Transferring and Filling the Crust
To transfer the crust, if it’s particularly delicate, you may want to slide a spatula underneath it, lifting it gently as you move it to your desired surface. Once in place, spoon the watermelon filling into the center of the crust, leaving about an inch of space around the edges. This space is essential for folding the crust over the filling later.
How to Fold the Edges for an Attractive Presentation
Folding the edges of the crust is where you can get creative. Start by gently lifting the edges of the crust and folding them over the watermelon filling. It’s perfectly fine if the filling peeks through; this adds to the rustic charm of the galette. Work your way around the galette, pleating the dough as you go. To secure the folds, press them gently against the crust. This not only enhances the aesthetic appeal but also ensures the filling stays contained during chilling.
Final Chilling Before Serving
After assembling the galette, it’s crucial to chill it again before serving. This final chilling period allows the flavors to meld and the crust to firm up, creating the ideal texture. Chill the assembled galette in the refrigerator for at least 30 minutes.
Importance of Chilling the Assembled Galette for Optimal Texture and Flavor
Chilling helps the watermelon juices settle and blend with the crust, creating a harmonious balance of flavors. Additionally, this step allows any residual moisture in the watermelon to be absorbed by the crust, ensuring it doesn’t become soggy.
Visual Cues to Look for in a Properly Set Galette
When it’s time to serve, look for a few visual cues to ensure your galette is perfectly set. The crust should appear slightly firm to the touch, and the watermelon filling should have a glistening appearance without excessive pooling of juice. If you see a little syrup forming at the bottom, that’s perfectly normal as it indicates the sweet flavors have melded beautifully.
Serving Suggestions
Presenting your Refreshing Watermelon No-Bake Galette can elevate the overall experience. Here are some creative ideas:
– Colorful Platters and Garnishes: Serve the galette on a vibrant platter. You can garnish it with fresh mint leaves or edible flowers to add a touch of elegance. A drizzle of honey or a sprinkle of coconut flakes can also enhance its visual appeal.
– Pairing Suggestions: This galette pairs wonderfully with a variety of beverages. Consider serving it with a refreshing iced tea, lemonade, or a light white wine. For a complete meal experience, serve it alongside a light salad featuring arugula, feta cheese, and a citrus vinaigrette.
– Occasion Recommendations: This dessert is perfect for summer parties, brunches, or picnics. Its light and refreshing nature makes it a delightful end to a meal on a hot day, and its easy preparation means you can spend more time enjoying the company of your guests.
Nutritional Information
The Refreshing Watermelon No-Bake Galette not only tastes great but is also packed with nutritional benefits. Watermelon is low in calories, making it a guilt-free indulgence perfect for summer. With about 30 calories per 100 grams, it’s a hydrating choice that can help you stay cool and refreshed.
Overview of the Health Benefits of the Ingredients Used
– Watermelon: Rich in vitamins A and C and packed with antioxidants, watermelon is excellent for hydration and skin health.
– Almonds: These nuts provide healthy fats, protein, and fiber, which can help keep you full longer.
– Coconut: Offering medium-chain triglycerides (MCTs), coconut can provide a quick source of energy and contribute to heart health.
Discussion of Dietary Considerations
This galette is an excellent option for various dietary needs. It is naturally gluten-free, as it uses almond and coconut for the crust, making it suitable for those with gluten sensitivities. Additionally, it’s vegan-friendly, as it does not contain any animal products.
Conclusion
The Refreshing Watermelon No-Bake Galette is a delightful, easy-to-make dessert that showcases the best of summer fruits. With its vibrant colors and refreshing flavors, this galette is a perfect way to enjoy seasonal produce while keeping your kitchen cool and your cooking simple.
Using fresh ingredients not only enhances the taste but also promotes healthy eating, allowing you to enjoy a guilt-free dessert. Whether for a backyard barbecue, a casual brunch, or a simple family dinner, this galette is sure to impress. Embrace the joys of no-bake recipes and celebrate the flavor of fresh watermelon with this tasty treat!