
Mini Pepperoni Pizza Bites Delight: A Tasty Twist on a Classic Favorite
Pizza is a beloved dish that transcends borders and cultures, celebrated in various forms and styles around the world. From traditional Neapolitan pies to creative toppings and shapes, pizza has a universal appeal that brings people together. Among the many incarnations of this favorite, mini pepperoni pizza bites stand out as a fun and easy-to-make snack or appetizer that’s perfect for any occasion. Whether you’re hosting a game night, throwing a birthday party, or simply looking for a quick bite to satisfy your pizza cravings, these delightful morsels are sure to please.
The charm of mini pepperoni pizza bites lies in their simplicity and versatility. Utilizing refrigerated crescent roll dough, these bites come together quickly, allowing you to whip up a delicious treat with minimal effort. The flaky, buttery texture of the crescent rolls pairs perfectly with gooey cheese, zesty pizza sauce, and savory pepperoni, creating a mini pizza experience that’s both satisfying and indulgent. Plus, the ease of preparation makes them an ideal option for busy weeknights or last-minute gatherings.
Understanding Mini Pepperoni Pizza Bites
Mini pepperoni pizza bites are not just a quick snack; they are a delightful culinary experience that can elevate any event. These bite-sized treats are perfect for a variety of occasions, including parties, game nights, and family gatherings. Their small size makes them easy to serve and consume, allowing guests to enjoy multiple bites without feeling overwhelmed.
One of the greatest joys of making mini pizza bites is the customization they offer. You can easily tailor these bites to suit different tastes and dietary preferences. While pepperoni is a classic topping, feel free to get creative with your ingredients. Consider adding vegetables like bell peppers or mushrooms, or even experimenting with different types of cheese. The possibilities are endless, making these pizza bites a versatile option for any palate.
The Ingredients Breakdown
Before you dive into the preparation, it’s helpful to understand the key ingredients that make up these mini pepperoni pizza bites:
1. Refrigerated Crescent Roll Dough: The star of the show, crescent roll dough provides convenience and a delightful texture. Its flaky layers create a light, airy base that complements the toppings perfectly. You can find this dough in the refrigerated section of your grocery store, making it a quick and easy option for busy cooks.
2. Pizza Sauce: The sauce is a foundational element of any pizza, and you have several options to choose from. Store-bought varieties are readily available and can save you time, but homemade pizza sauce can elevate the flavor profile. A simple mix of crushed tomatoes, garlic, and herbs can create a fresh and vibrant sauce that enhances the overall taste of your pizza bites.
3. Shredded Mozzarella Cheese: Cheese is essential for achieving that gooey, melty texture we all love in pizza. Opt for high-quality mozzarella cheese for the best results. You can also experiment with different types of cheese, such as provolone or cheddar, to add depth and richness to your bites.
4. Mini Pepperoni Slices: These bite-sized slices pack a flavorful punch. The savory and slightly spicy profile of pepperoni is a classic choice that complements the other ingredients beautifully. If you’re looking for alternatives, consider using turkey pepperoni, or even diced ham or cooked sausage for a different taste.
5. Optional Seasonings: To enhance the flavor of your mini pizza bites, consider adding seasonings such as Italian seasoning, garlic powder, or crushed red pepper flakes. These small additions can make a big difference in flavor, taking your bites from good to extraordinary.
6. Fresh Herbs for Garnish: A sprinkle of fresh herbs, such as basil or parsley, not only adds visual appeal but also brings a burst of freshness to your pizza bites. These herbs can elevate the dish and provide a contrast to the rich flavors of cheese and sauce.
7. Sourcing High-Quality Ingredients: For the best results, it’s essential to use high-quality ingredients. Look for fresh produce, artisanal cheeses, and quality sauces. Local grocery stores or farmers’ markets often carry superior products that can enhance the overall taste of your mini pepperoni pizza bites.
Preparing Your Workstation
Before you start assembling your mini pepperoni pizza bites, it’s important to prepare your kitchen for a smooth cooking experience. A clean and organized workspace can make all the difference when it comes to efficiency and enjoyment in the kitchen.
Tools and Equipment Needed
Gather the following tools and equipment to ensure you have everything you need at your fingertips:
– Baking Sheet: A sturdy baking sheet is essential for cooking your pizza bites evenly.
– Parchment Paper: Lining your baking sheet with parchment paper can prevent sticking and make cleanup a breeze.
– Pizza Cutter: A pizza cutter or sharp knife will be useful for slicing your crescent rolls and cutting any larger pieces into bite-sized portions.
– Pastry Brush: If you choose to brush your pizza bites with butter or egg wash for a golden finish, a pastry brush will come in handy.
Safety and Cleanliness Tips
Safety and cleanliness are paramount in the kitchen. Make sure to wash your hands before handling food, and keep your workspace tidy to avoid cross-contamination. Use separate cutting boards for raw meats and vegetables, and ensure that all surfaces are clean before you begin.
Step-by-Step Instructions
Now that you have a clear understanding of the ingredients and tools you’ll need, it’s time to dive into the step-by-step process of creating your mini pepperoni pizza bites.
1. Preheat the Oven: Start by preheating your oven to the temperature recommended on the crescent roll dough package, typically around 375°F.
2. Prepare the Baking Sheet: Line your baking sheet with parchment paper to prevent sticking and make cleanup easier.
3. Roll Out the Crescent Dough: Open the package of crescent roll dough and carefully unroll it. You should find pre-scored triangles that will form the basis of your pizza bites.
4. Cut the Dough: Depending on your desired size, you can either leave the triangles as they are or cut them into smaller pieces for mini bites.
5. Assemble the Pizza Bites: Place a small spoonful of pizza sauce at the base of each triangle, followed by a sprinkle of mozzarella cheese and a few mini pepperoni slices. Be careful not to overfill, as you’ll need to fold the dough over to create a pocket.
6. Fold and Seal: Gently fold the dough over the filling to create a pocket, pinching the edges to seal them securely. This step is crucial to prevent any filling from leaking out during baking.
7. Brush with Butter: For an extra touch of flavor and golden color, brush the tops of the dough with melted butter or an egg wash.
8. Bake: Place the prepared baking sheet in the preheated oven and bake according to the dough package instructions, usually around 12-15 minutes or until golden brown.
By following these initial steps, you’re well on your way to creating a batch of mini pepperoni pizza bites that are sure to impress your family and friends. Stay tuned for the next part of this article, where we’ll delve into the finishing touches and serving suggestions that will make your mini pizza bites the star of any gathering.
{{image_2}}
Preheating the Oven: Why Temperature Matters for Baking
Before diving into the assembly of your mini pepperoni pizza bites, you’ll want to preheat your oven to 375°F (190°C). This step is crucial because the right temperature ensures that your pizza bites will bake evenly, resulting in a perfectly crisp outer layer while keeping the filling hot and melty. Preheating also helps activate the yeast in the dough, which is essential for achieving that light and fluffy texture. Always allow your oven sufficient time to reach the desired temperature before placing your pizza bites inside; this will help them rise properly and achieve a golden-brown finish.
Preparing the Dough: Techniques for Seamless Assembly
For this recipe, you can use store-bought pizza dough for convenience, or you can make your own from scratch if you’re feeling adventurous. If you choose to make your own dough, let it rest for at least 30 minutes after kneading. This resting period allows the gluten to relax, making it easier to roll out. Dust your work surface with flour to prevent sticking and roll the dough into a large rectangle about 1/8-inch thick. This thickness will ensure that your pizza bites are sturdy enough to hold the filling without becoming soggy.
If you’re using pre-made dough, simply let it come to room temperature as per package instructions, making it easier to work with.
Cutting the Dough: Tips for Even Squares and Efficient Assembly
Once your dough is prepared, it’s time to cut it into squares. Using a pizza cutter or a sharp knife, slice the dough into 2-inch squares. This size is perfect for creating bite-sized portions that are easy to handle and eat. To ensure uniformity, you might want to use a ruler or a template for measuring. Cutting the dough into even pieces also helps with baking consistency, as all bites will cook at the same rate.
Lay your cut squares on a lightly floured surface or parchment paper to prevent sticking while you assemble your pizza bites.
Assembling the Pizza Bites: Creating the Perfect Balance of Sauce, Cheese, and Pepperoni
Now comes the fun part: assembling your mini pizza bites! Place a tablespoon of pizza sauce in the center of each dough square. Be careful not to overfill them, as too much sauce can lead to soggy bites. Follow the sauce with a sprinkle of shredded cheese—mozzarella is traditional, but feel free to mix in some provolone or cheddar for added flavor.
Next, add a few slices of pepperoni on top of the cheese. You want to create a balanced layer of sauce, cheese, and toppings in every bite. Once everything is neatly piled, fold the corners of the dough over the filling to create a pocket.
Folding and Sealing: Ensuring No Filling Leaks During Baking
To seal your mini pizza bites effectively, pinch the edges of the dough together firmly. This step is essential to prevent any filling from leaking out during baking. You can also use a fork to crimp the edges, adding a decorative touch while ensuring a tight seal. If you find that the dough is dry and not sticking together well, a bit of water can help moisten the edges.
Brushing with Olive Oil: The Role of Oil in Achieving Golden-Brown Results
Once your pizza bites are assembled and sealed, it’s time to enhance their appearance and flavor with a light brushing of olive oil. Using a pastry brush, apply a thin layer of olive oil over the tops of the bites. This oil not only adds richness but also promotes browning, giving your pizza bites that enticing golden color. You may also sprinkle a pinch of Italian seasoning or garlic powder on top for added flavor.
Baking: Knowing When They Are Done and What to Look for in Doneness
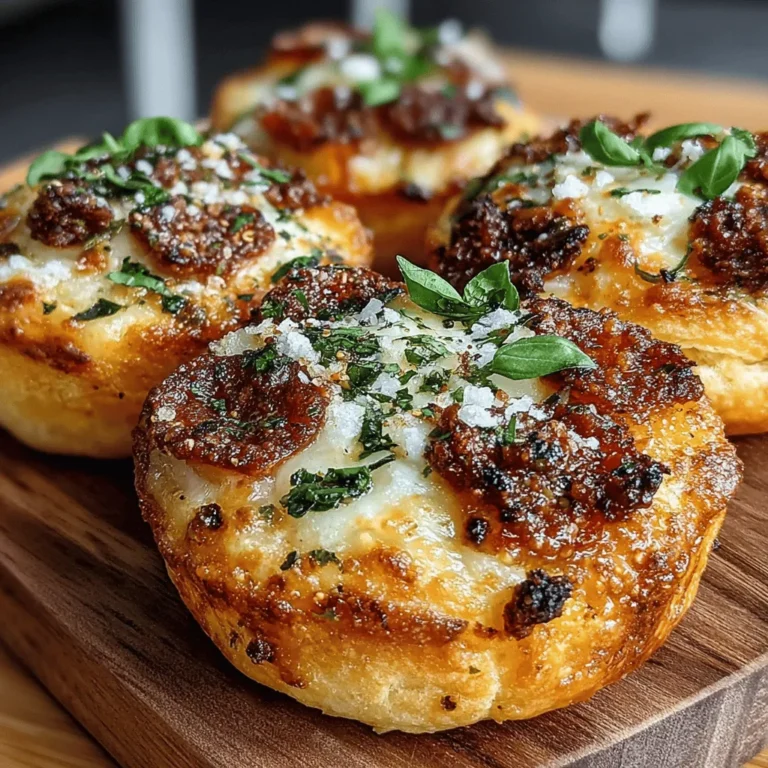
Place your assembled pizza bites on a baking sheet lined with parchment paper. Bake in the preheated oven for 15 to 20 minutes or until they are puffed up and golden brown. Keep an eye on them during the last few minutes of baking; ovens can vary in temperature, and you don’t want them to burn. The pizza bites are done when they are lightly browned on top and the cheese is bubbling inside.
Garnishing and Serving: Tips for Presentation and Serving Suggestions
Once your mini pepperoni pizza bites are out of the oven, allow them to cool for a few minutes before serving. This cooling period will help the filling set slightly, making them easier to handle. For a beautiful presentation, arrange the bites on a large platter and garnish with fresh basil leaves or a sprinkle of parmesan cheese.
These pizza bites are perfect for parties, game days, or casual movie nights. Serve them alongside a variety of dipping sauces such as extra pizza sauce, ranch dressing, or garlic butter to elevate the experience.
Nutritional Information
When indulging in mini pepperoni pizza bites, it’s important to consider their nutritional content. An average serving (about 3 bites) contains approximately 250 calories, with about 10 grams of protein and 15 grams of fat. The caloric breakdown primarily comes from the dough and cheese, while pepperoni adds protein and fat content.
For those looking to make the recipe healthier, consider using whole wheat dough instead of white flour. Additionally, opting for low-fat cheese and turkey pepperoni can significantly reduce calories without sacrificing flavor.
Serving Suggestions and Pairings
To enhance your mini pizza bites experience, consider pairing them with refreshing side dishes or dipping sauces. A crisp green salad with a tangy vinaigrette complements the richness of the bites beautifully. For a more substantial offering, serve alongside a veggie platter featuring fresh carrots, celery, and cherry tomatoes with a creamy dip.
These pizza bites can also take center stage at themed parties. Whether it’s a game day gathering or a cozy movie night, they’re bound to be a hit. Set up a toppings bar with additional options like jalapeños, olives, or sautéed mushrooms to let guests customize their bites.
Variations and Customizations
One of the best aspects of mini pepperoni pizza bites is their versatility. You can easily customize the filling to suit your taste or dietary needs. For a vegetarian option, swap out the pepperoni for a mix of sautéed vegetables like bell peppers, mushrooms, and spinach. You could also experiment with BBQ chicken bites by using shredded chicken tossed in BBQ sauce, along with cheese and onions for a sweet twist.
For those with dietary restrictions, gluten-free dough or alternative crusts made from cauliflower or almond flour can be used. Additionally, incorporating seasonal ingredients such as fresh basil in the summer or roasted butternut squash in the fall can add unique flavors to your pizza bites.
Conclusion
Making mini pepperoni pizza bites is not only easy but also a wonderfully fun activity that brings people together. Whether you’re preparing them for a casual family night or a festive gathering, these bites are sure to be a crowd-pleaser. The joy of cooking is in the creativity—experiment with different fillings, sauces, and presentations to make the recipe your own. So gather your ingredients, invite some friends or family, and enjoy the delightful experience of crafting and sharing these tasty treats. Cooking is not just about the food; it’s about creating memories that last a lifetime.
