
Savory Garlic Herb Roasted Turkey Recipe
Roasted turkey holds a cherished place in the hearts and homes of many, particularly during festive gatherings and family celebrations. Whether gracing the table at Thanksgiving, Christmas, or any special occasion, a beautifully roasted turkey serves not only as the centerpiece of the meal but also as a symbol of togetherness and tradition. With the aroma of savory herbs and garlic wafting through the air, it invites everyone to gather around and share in the joy of good food and cherished company.
In this article, we will explore a delicious twist on the classic roasted turkey: the Savory Garlic Herb Roasted Turkey. This recipe infuses the traditional preparation with a delightful mix of flavors, elevating the humble turkey to new culinary heights. The emphasis on using fresh herbs and quality ingredients ensures that each bite is bursting with flavor, making it a memorable feast for your family and friends.
Understanding the Ingredients
To create the perfect Savory Garlic Herb Roasted Turkey, understanding each ingredient’s role is essential. The choice of ingredients not only affects the final taste but also contributes to the overall experience of the meal.
Whole Turkey
Choosing the right turkey is the first step in your culinary journey. When selecting a whole turkey, consider the size and quality. A good rule of thumb is to allocate about 1 to 1.5 pounds of turkey per person. For a gathering of eight, a turkey weighing between 12 to 15 pounds is ideal. Look for a fresh or frozen turkey that is free from additives and preservatives. Organic or pasture-raised turkeys often deliver a richer flavor and are more humanely raised, making them a preferred choice for many home cooks.
Unsalted Butter
The use of unsalted butter is pivotal in this recipe. Room temperature butter is essential as it allows for effortless blending with the fresh herbs and garlic, creating a flavorful herb butter that can be spread under the turkey skin. The unsalted variety gives you better control over the seasoning, allowing the natural flavors of the turkey and herbs to shine without the interference of added salt.
Fresh Herbs: Rosemary, Thyme, and Sage
Fresh herbs are the stars of this recipe, each offering unique flavor profiles that enhance the turkey’s taste. Rosemary brings a robust, pine-like aroma that complements the richness of the turkey. Thyme adds a subtle earthiness, while sage contributes warmth and depth, often associated with traditional holiday dishes. Using fresh herbs instead of dried ones not only enhances the flavor but also adds a vibrant touch to the presentation.
Garlic
Garlic is a key ingredient that elevates the savory notes of the turkey. When roasted, garlic becomes sweet and mellow, infusing the turkey with a rich aroma that is both comforting and inviting. The combination of garlic and herbs creates a harmonious blend that permeates the meat, ensuring that every bite is packed with flavor.
Vegetables: Onion, Carrots, and Celery
The aromatic trio of onion, carrots, and celery plays a crucial role in flavoring the broth during roasting. These vegetables not only provide moisture but also contribute to a rich, flavorful base that keeps the turkey succulent. They can be placed in the roasting pan to create a bed for the turkey, allowing the drippings to mingle with the vegetables, ultimately enhancing the gravy.
Chicken Broth
Using low-sodium chicken broth is essential for maintaining control over the saltiness of your dish. The broth serves as a flavorful liquid to baste the turkey during roasting, helping to keep it moist and adding depth to the overall flavor.
Preparation Steps for a Perfect Turkey
Preparing the turkey properly is vital for achieving a beautifully roasted bird. Here are the initial steps to ensure your turkey is ready for roasting.
Thawing and Cleaning
If you’re using a frozen turkey, begin the thawing process at least 24 hours for every 4-5 pounds of turkey. This gradual thawing in the refrigerator ensures that the turkey remains at a safe temperature. Once thawed, it’s important to clean the turkey thoroughly. Remove the giblets and neck from the cavity, and rinse the turkey under cold water. Pat the turkey dry with paper towels to ensure a crispy skin during roasting. Moisture on the skin can lead to steaming rather than roasting, so this step is crucial.
Drying the Turkey
After cleaning, the next step is to dry the turkey. Using paper towels, gently pat the skin and cavity dry. This will help achieve that coveted crispy skin once the turkey is in the oven. For an even better result, consider leaving the turkey uncovered in the refrigerator for several hours or overnight. This drying technique allows the skin to become even drier, leading to a better crisp when roasting.
Crafting the Herb Butter
Now that your turkey is prepped, it’s time to create the flavorful garlic herb butter that will infuse the meat with deliciousness. Here’s a step-by-step guide to making this essential component:
1. Gather Your Ingredients: You’ll need room temperature unsalted butter, minced garlic, and your selection of fresh herbs: chopped rosemary, thyme, and sage. A pinch of salt and pepper can be added for seasoning.
2. Mix the Butter: In a medium bowl, combine the unsalted butter with the minced garlic and chopped herbs. Use a fork or spatula to blend everything until it’s well combined. The goal is to create a spreadable consistency that can easily be applied under the turkey skin.
3. Taste and Adjust: Before using the herb butter, taste it to ensure the flavors are balanced. If necessary, adjust the seasoning with more salt, pepper, or herbs to suit your palate.
4. Apply Generously: Carefully loosen the skin of the turkey over the breast and thighs, creating pockets without tearing the skin. Use your fingers or a small spatula to spread the herb butter evenly under the skin. This technique not only enhances the flavor but also helps keep the meat moist during roasting.
With the turkey prepared and the herb butter ready, you’re well on your way to creating a mouthwatering Savory Garlic Herb Roasted Turkey that will leave your guests raving. Stay tuned as we delve deeper into the roasting process, basting techniques, and serving suggestions to make your turkey the star of the show.
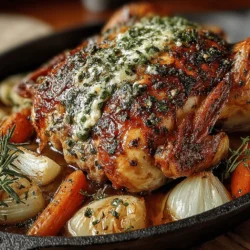
{{image_2}}
How to Properly Apply Herb Butter Under the Skin for Maximum Flavor Infusion
Applying herb butter under the skin of the turkey is a game-changer for infusing flavor directly into the meat. To achieve maximum flavor infusion, follow these simple steps:
1. Prepare the Herb Butter: Start by mixing softened butter with minced garlic, chopped fresh herbs (such as thyme, rosemary, and parsley), salt, and pepper. The consistency should be spreadable but firm enough to hold its shape.
2. Loosen the Skin: Gently slide your fingers between the turkey skin and the meat to separate them. Be careful not to tear the skin, as it acts as a protective barrier during cooking.
3. Spread the Herb Butter: Using your fingers or a small spatula, carefully spread the herb butter under the skin, concentrating on the breast area. Ensure an even distribution for maximum flavor. You can also rub some of the herb butter over the skin for added flavor and a crispy finish.
4. Seal the Turkey: Once the herb butter is applied, gently press the skin back into place to keep the butter from oozing out during the roasting process. This method not only enhances flavor but also helps to keep the meat juicy.
Setting Up for Roasting
Preparing the Roasting Pan for Optimal Flavor
A well-prepared roasting pan is essential for achieving a delicious roasted turkey. Here’s how to set it up:
1. Choose the Right Pan: Select a heavy-duty roasting pan that is large enough to hold the turkey securely. A pan with low sides allows for better air circulation and browning.
2. Layer Vegetables: Place a layer of chopped vegetables (carrots, onions, celery, and garlic) at the bottom of the pan. These vegetables not only add flavor to the turkey but also serve as a natural rack, elevating the bird off the bottom of the pan.
3. Add Broth: Pour a cup or two of low-sodium chicken or turkey broth over the vegetables. This liquid will help keep the turkey moist during roasting and create a flavorful base for gravy.
Importance of Layering Vegetables and Using Broth for Moisture
Layering vegetables in the roasting pan is crucial for several reasons:
– Flavor Enhancement: As the turkey roasts, the juices drip down into the vegetables, creating a rich and aromatic base that can be transformed into a delicious gravy.
– Moisture Retention: The broth will evaporate during cooking, adding moisture to the roasting environment and preventing the turkey from drying out.
Explanation of Roasting Racks and Their Benefits for Even Cooking
Using a roasting rack is highly recommended for even cooking. A rack elevates the turkey, allowing hot air to circulate all around it, ensuring uniform cooking. Additionally, the rack catches drippings, which can be used for gravy without burning. If you don’t have a rack, you can make a makeshift one using rolled-up foil or crumpled parchment paper.
Roasting Process
Detailed Roasting Instructions
Once your turkey is prepped and the pan is ready, it’s time to roast. Here’s a step-by-step guide:
1. Preheat the Oven: Preheat your oven to 325°F (165°C). This temperature allows the turkey to cook evenly without drying out.
2. Place the Turkey in the Oven: Position the turkey breast-side up on the rack in the roasting pan. Tuck the wing tips under the turkey to prevent them from burning.
3. Calculate Cooking Time: A general rule of thumb is to roast the turkey for about 13-15 minutes per pound. For example, a 15-pound turkey will need approximately 3 to 3.5 hours.
4. Monitor Temperature: Use a meat thermometer to check the turkey’s internal temperature. Insert it into the thickest part of the thigh without touching the bone. The turkey is done when it reaches an internal temperature of 165°F (75°C).
Significance of Using a Meat Thermometer for Safety and Doneness
Using a meat thermometer is the most reliable way to ensure your turkey is cooked to perfection. It prevents undercooking, which can lead to foodborne illnesses, and overcooking, which results in dry meat. Always rely on the thermometer rather than cookbook times alone.
Basting Techniques and Their Importance
Basting the turkey periodically during roasting keeps the skin moist and flavorful. Here’s how to do it effectively:
1. Baste with Pan Juices: Every 30-45 minutes, use a baster or a spoon to drizzle the pan juices over the turkey. This adds moisture and enhances the flavor.
2. Avoid Opening the Oven Too Often: Each time you open the oven door, heat escapes, prolonging cooking time. Limit basting to a few times during the roast.
Resting the Turkey
Why Resting is Crucial After Roasting
Resting your turkey after roasting is an essential step that many home cooks overlook. Here’s why it matters:
– Juiciness: Resting allows the juices to redistribute throughout the meat, ensuring that every slice is moist and flavorful.
– Flavor Distribution: As the turkey rests, the temperature throughout the bird equalizes, enhancing the overall flavor.
How Resting Impacts Juiciness and Flavor Distribution
When you carve into a hot turkey immediately after removing it from the oven, the juices will run out, resulting in dry meat. Allowing it to rest for at least 20-30 minutes ensures a juicy and flavorful turkey that is a joy to eat.
Tips on How to Tent the Turkey Properly for Resting
To rest your turkey properly:
1. Tent with Foil: Loosely cover the turkey with aluminum foil. This helps keep the heat in while allowing some steam to escape, preventing the skin from becoming soggy.
2. Avoid Tight Wrapping: Do not wrap it tightly, as this can trap too much steam and compromise the crispiness of the skin.
Serving Suggestions
Presentation Ideas for Carving and Serving the Turkey
When it comes to serving your savory garlic herb roasted turkey, presentation is key. Here are some tips:
1. Carve with Care: Use a sharp carving knife to slice the turkey against the grain. Start with the legs and thighs, then move to the breast meat.
2. Arrange on a Platter: Arrange the carved turkey on a large serving platter, creating an inviting display.
Garnishing Tips with Fresh Herbs for Visual Appeal
For a beautiful finishing touch, garnish the platter with fresh herbs such as rosemary, thyme, and parsley. This not only adds color but also enhances the aroma of your dish.
Suggestions for Complementary Side Dishes
To create a complete meal, consider serving your roasted turkey with these delicious side dishes:
– Classic Stuffing: A savory stuffing made with herbs, vegetables, and bread complements the turkey perfectly.
– Cranberry Sauce: The tartness of cranberry sauce balances the richness of the turkey.
– Roasted Vegetables: Seasonal roasted vegetables add color and nutrition to your table.
– Mashed Potatoes: Creamy mashed potatoes are a traditional favorite that pairs wonderfully with turkey.
Conclusion
The savory garlic herb roasted turkey is not just a meal; it’s a centerpiece for festive gatherings that brings family and friends together. This recipe, with its aromatic herb butter and carefully orchestrated roasting process, ensures that your turkey will be the star of the show.
As you embark on this culinary journey, remember that the joy of preparing and sharing a beautifully roasted turkey is immeasurable. The flavors, aromas, and the memories created around the dining table will be cherished by all.
We encourage you to try this recipe for its delightful flavor and the wonderful aroma that fills your kitchen. With each bite, you’ll create lasting memories that make your gatherings truly unforgettable. Happy roasting!