Cheesy Bliss Baked Mac & Cheese Recipe
Introduction
When it comes to comfort food, few dishes can rival the warm embrace of a well-made mac and cheese. This beloved classic has earned its place in the hearts and homes of people across the world, becoming synonymous with cozy gatherings, family dinners, and nostalgic childhood memories. Whether it’s a rainy day treat, a holiday feast, or a simple weeknight meal, mac and cheese offers a satisfying combination of creamy, cheesy goodness and tender pasta that appeals to adults and kids alike.
Enter the Cheesy Bliss Baked Mac & Cheese – a dish that elevates the traditional recipe into a gourmet experience. With its rich, velvety sauce, perfectly baked top, and a balance of flavors that will make your taste buds sing, this mac and cheese is not just a meal; it’s an event. Ideal for family gatherings, potlucks, or those cozy nights in when you want something comforting, this recipe promises to deliver a delightful experience that leaves everyone asking for seconds.
In this article, we will explore the essence of Cheesy Bliss Baked Mac & Cheese, diving into its rich texture and delicious flavor profile. We will also walk you through the necessary ingredients and the initial steps to create this incredible dish.
Understanding the Basics of Mac and Cheese
The genesis of mac and cheese can be traced back to the 18th century, with roots in Italian cuisine and a journey that has seen various adaptations over the years. Originally, this dish featured simple combinations of pasta and cheese, but over time, it has evolved into a canvas for culinary creativity. Today, mac and cheese can range from classic stovetop versions to elaborate baked concoctions, each offering its own unique twist on the beloved classic.
At the heart of every exceptional mac and cheese is the choice of pasta and cheese. Elbow macaroni is the traditional favorite, thanks to its shape that holds onto the creamy cheese sauce. However, there are other pasta options, such as shells or cavatappi, that can also work beautifully, each offering a different texture and bite.
Cheese is another critical element; selecting the right varieties is essential for achieving the best flavor and creaminess. While classic recipes may call for cheddar alone, blending cheeses like mozzarella or Gruyere can take the taste to new heights. This perfect union of pasta and cheese is what makes homemade mac and cheese stand out from its store-bought counterparts, which often rely on preservatives and artificial flavors.
Homemade versions allow for customization, ensuring that you can tailor the dish to your personal preferences and dietary needs. By preparing mac and cheese from scratch, you have complete control over the ingredients, leading to a fresher and more flavorful result.
Essential Ingredients for Cheesy Bliss Baked Mac & Cheese
To create the perfect Cheesy Bliss Baked Mac & Cheese, you will need a few key ingredients, each playing a vital role in building the dish’s flavor and texture:
– Elbow Macaroni: The quintessential pasta choice for mac and cheese, elbow macaroni’s small, curved shape allows for optimal cheese coverage, making each bite a delightful experience. While traditional, feel free to experiment with other shapes based on your preference.
– Unsalted Butter: This ingredient is crucial for flavor and consistency. Using unsalted butter allows you to control the saltiness of your dish, ensuring a balanced flavor profile. It also serves as the base for the roux, which thickens the cheese sauce.
– All-Purpose Flour: Essential for creating the roux, all-purpose flour helps to thicken the cheese sauce, giving it that luscious, creamy texture. The roux is the backbone of the dish, so make sure to cook it properly to avoid a raw flour taste.
– Whole Milk: Full-fat milk is recommended for its creaminess, contributing to the luxurious texture of the cheese sauce. The richness of whole milk ensures that the sauce is not only flavorful but also beautifully smooth.
– Sharp Cheddar and Mozzarella: A combination of sharp cheddar and mozzarella is ideal for depth of flavor and a gooey texture. Sharp cheddar provides that quintessential tangy cheese flavor, while mozzarella adds creaminess and stretch, making for an irresistible cheesy experience.
– Seasonings: While the cheese and pasta are the stars of the dish, seasonings play a significant role in enhancing the overall flavor. A blend of garlic powder, onion powder, and smoked paprika can elevate the dish, adding complexity and warmth that complements the cheese.
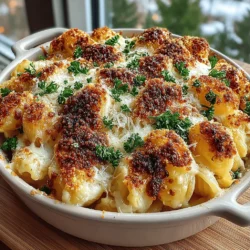
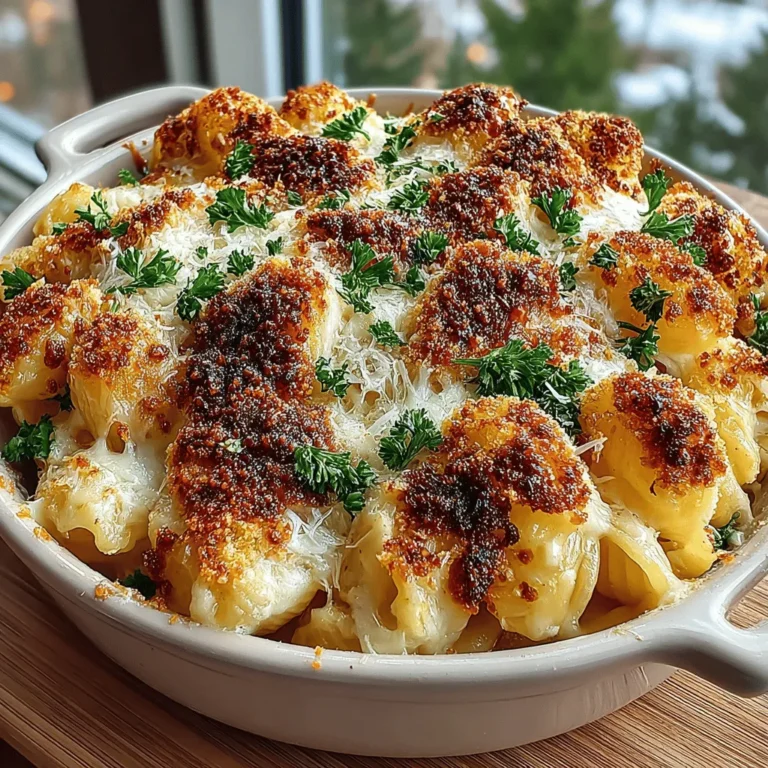
– Optional Toppings: For those who enjoy a bit of crunch, consider adding breadcrumbs and grated Parmesan cheese on top before baking. This combination adds texture and a golden, crispy finish that contrasts beautifully with the creamy interior of the mac and cheese.
Step-by-Step Instructions for Preparing Cheesy Bliss Baked Mac & Cheese
Now that you have all your ingredients ready, it’s time to start preparing your Cheesy Bliss Baked Mac & Cheese. The first step in this delicious journey is to preheat your oven. Setting the right temperature is crucial for optimal baking, ensuring that your mac and cheese develops a beautifully browned top while remaining creamy and decadent inside. Preheat your oven to 350°F (175°C) to create the perfect environment for your dish to bake evenly.
As we delve deeper into the preparation process, we will guide you step-by-step through making the cheese sauce, cooking the pasta, and assembling the dish for baking. Stay tuned as we continue to explore this delightful recipe that promises to bring joy to your table and warmth to your heart.
{{image_2}}
Cooking the Pasta
To achieve the perfect al dente texture for your mac and cheese, choosing the right pasta and cooking method is essential. Elbow macaroni is the traditional choice, but you can also experiment with cavatappi or fusilli for added texture and sauce adherence.
1. Bring a Large Pot of Water to a Boil: Use a ratio of 4 to 6 quarts of water for every pound of pasta. Adding salt to the boiling water enhances flavor and ensures that the pasta is seasoned evenly.
2. Cook the Pasta: Add the pasta to the boiling water and stir occasionally to prevent sticking. Follow the package instructions, but start checking for doneness about 1-2 minutes before the recommended cooking time. You want the pasta to be firm to the bite, as it will continue cooking in the oven.
3. Drain and Rinse: Once the pasta reaches al dente, drain it in a colander. Rinsing under cold water halts the cooking process and prevents the pasta from becoming mushy. Set aside while you prepare the cheese sauce.
Preparing the Cheese Sauce
Creating the Roux
The roux is the foundation of your cheese sauce, providing thickness and stability. Here’s how to create a perfect roux:
1. Melt the Butter: In a medium saucepan over medium heat, melt 1/4 cup of unsalted butter. It’s important to watch the butter carefully to prevent browning.
2. Add the Flour: Once the butter is melted, sprinkle in 1/4 cup of all-purpose flour. Stir continuously with a whisk for about 2 minutes. This cooking time is crucial to eliminate any raw flour taste while achieving a light golden color.
Gradually Incorporating Milk
After your roux is ready, it’s time to add the milk, which creates the creamy base for your cheese sauce.
1. Slowly Add Milk: Gradually whisk in 2 cups of whole milk. Adding the milk slowly helps to prevent lumps from forming. Continue whisking until smooth.
2. Thicken the Sauce: Keep stirring over medium heat until the mixture begins to thicken and bubble. This should take about 5-7 minutes. Once thickened, you’ll know it’s ready for the cheese.
Melting the Cheeses
Achieving that smooth, creamy texture in your cheese sauce is all about how you incorporate the cheese.
1. Choose Your Cheeses: For this recipe, a blend of sharp cheddar, creamy gouda, and mozzarella works beautifully. Use about 2 cups of shredded cheese in total.
2. Add Cheese Gradually: Reduce the heat to low and gradually stir in the shredded cheese. Mix until the cheese is fully melted and the sauce is creamy. Make sure to taste the sauce at this stage to adjust seasoning if needed.
Seasoning the Sauce
Proper seasoning is key to elevating your cheese sauce.
1. Add Seasonings: Stir in salt, pepper, and a pinch of cayenne pepper for a bit of heat. You can also add a teaspoon of Dijon mustard for a subtle tang that complements the cheese beautifully.
2. Balance the Flavors: Taste your sauce and adjust the seasoning as necessary. Remember, flavors will deepen as they bake, so aim for a slightly stronger flavor profile.
Combining Pasta with Cheese Sauce
Now it’s time to bring everything together for your cheesy bliss.
1. Mix the Pasta and Sauce: In a large mixing bowl, combine the cooked pasta with the cheese sauce. Gently fold the pasta into the sauce, ensuring every noodle is well-coated.
2. Technique: Use a spatula to lift and turn the pasta rather than stirring vigorously, which can break the noodles. This method helps maintain the integrity of the pasta while ensuring a uniform coverage.
Baking and Finishing Touches
Transferring to the Baking Dish
1. Choose Your Dish: Preheat your oven to 350°F (175°C). Grease a 9×13-inch baking dish with butter or non-stick spray.
2. Even Spread: Pour the mac and cheese mixture into the prepared baking dish, spreading it evenly to ensure even cooking throughout.
Optional Crispy Topping
A crispy topping adds texture and enhances the overall dish.
1. Prepare the Topping: In a small bowl, mix 1 cup of breadcrumbs with 1/2 cup of grated Parmesan cheese and a tablespoon of melted butter. This combination will create a delicious, crunchy layer.
2. Apply the Topping: Sprinkle the breadcrumb mixture evenly over the mac and cheese before baking.
Baking Instructions
1. Bake: Place the dish in the preheated oven. Bake for 25-30 minutes, or until the top is golden brown and bubbly.
2. Broil for Extra Crisp: For an extra crispy finish, you can broil the dish for an additional 2-3 minutes, keeping a close eye to prevent burning.
Garnishing
Presentation is key to any dish.
1. Garnish: Once out of the oven, let it cool for a few minutes. Garnish with freshly chopped parsley and an optional drizzle of extra melted cheese for that Instagram-worthy touch.
Serving Suggestions and Pairings
Ideas for Serving
– Individual Bowls vs. Family-Style Serving: Serve the mac and cheese in individual bowls for a cozy, personal touch, or present it family-style in the baking dish for a more communal dining experience.
Pairing Recommendations
– Side Dishes: Pair your cheesy mac with a fresh garden salad or steamed broccoli to balance the richness. Roasted vegetables also make an excellent accompaniment.
– Beverages: A crisp white wine like Sauvignon Blanc or a light lager can complement the creamy flavors beautifully. For a non-alcoholic option, sparkling water with lemon can refresh the palate.
Discussing the Versatility of the Dish
One of the best things about baked mac and cheese is its versatility.
– Adding Vegetables: Consider adding steamed broccoli, sautéed spinach, or roasted red peppers to introduce some color and nutrients.
– Incorporating Proteins: For a heartier dish, add cooked chicken, bacon, or even lobster for a gourmet twist.
– Flavor Variations: Experiment with different cheese combinations, such as pepper jack for heat or blue cheese for a sharp, tangy flavor.
Conclusion
Cheesy Bliss Baked Mac & Cheese is more than just a dish; it’s a comforting experience that brings joy to the table. Its creamy texture, melty cheese, and crispy topping make it the perfect indulgence for any occasion.
We encourage you to try this recipe, savor the homemade flavors, and share the joy of cooking with your loved ones. The satisfaction of creating something delicious from scratch and enjoying it together is unmatched. So gather your ingredients, roll up your sleeves, and embark on this cheesy adventure that is sure to become a family favorite!