Go Back
Stuffed bell peppers have long been cherished as a versatile and satisfying dish. Their vibrant colors, hearty filling, and easy customization make them a favorite in kitchens around the globe. From casual family dinners to elegant gatherings, these delectable vessels can accommodate a variety of fillings, making them a go-to option for both health-conscious eaters and food lovers alike.

Stuffed Bell Peppers

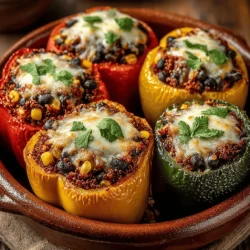
Discover the vibrant and nutritious Savory Quinoa Stuffed Bell Peppers, a dish that combines the natural sweetness of bell peppers with the protein-packed goodness of quinoa. Perfect for family dinners or gatherings, this adaptable recipe caters to various dietary needs and tastes. With a rich filling of quinoa, beans, corn, and spices, these colorful peppers are both healthy and satisfying. Explore endless variations and creative serving ideas while enjoying a delicious plant-based meal.

Ingredients
  

4 large bell peppers (any color of your choice)

1 cup quinoa, rinsed and drained

2 cups vegetable broth

1 can (15 oz) black beans, drained and rinsed

1 cup corn (can be frozen or canned)

1 medium onion, finely chopped

2 cloves garlic, minced

1 teaspoon ground cumin

1 teaspoon smoked paprika

1/2 teaspoon chili powder

1 cup diced tomatoes (fresh or canned)

1 cup shredded cheese (cheddar or a cheese blend works well)

Salt and freshly ground black pepper to taste

Fresh cilantro or parsley, chopped, for garnish

Olive oil for sautéing and brushing

Instructions
 

Preheat the Oven: Start by preheating your oven to 375°F (190°C).

    Prepare the Bell Peppers: Carefully slice off the tops of the bell peppers, remove the seeds and inner membranes thoroughly, and set them aside. Lightly brush the outside of each pepper with olive oil and arrange them upright in a baking dish.

      Cook the Quinoa: In a medium saucepan, combine the rinsed quinoa and vegetable broth. Bring the mixture to a boil over high heat. Once boiling, reduce the heat to low, cover with a lid, and let it simmer for about 15 minutes, or until all the liquid has been absorbed. Once done, fluff the quinoa gently with a fork and set it aside to cool slightly.

        Sauté the Vegetables: In a large skillet, heat a drizzle of olive oil over medium heat. Add the finely chopped onion to the skillet and sauté for about 5 minutes, or until it becomes translucent and soft.

          Add Garlic and Spices: Stir in the minced garlic, cooking for an additional minute until fragrant. Next, add in the black beans, corn, and diced tomatoes, followed by the cumin, smoked paprika, chili powder, salt, and pepper. Stir the mixture well and let it cook for another 5-7 minutes to blend the flavors and heat through.

            Combine Quinoa and Filling: Gently fold the cooked quinoa into the vegetable mixture, stirring in half of the shredded cheese until everything is evenly mixed.

              Stuff the Peppers: Generously spoon the quinoa and vegetable filling into each bell pepper, packing it tightly to ensure they are filled. Top each pepper with the remaining shredded cheese.

                Bake the Peppers: Cover the baking dish with aluminum foil and place it in the preheated oven. Bake for 25 minutes. After that, remove the foil and continue baking for an additional 10-15 minutes, or until the cheese is melted and bubbly.

                  Cool and Garnish: Once baked, remove the peppers from the oven and let them cool for a few minutes. Just before serving, garnish with fresh chopped cilantro or parsley for an added touch of freshness.

                    Prep Time, Total Time, Servings:

                      - Prep Time: 15 minutes

                        - Total Time: 50 minutes

                          - Servings: 4 servings

                            ---

                              Presentation Tips:

                                Serve the stuffed peppers on individual plates, drizzling a little olive oil around the base for added flavor. You might also want to sprinkle some additional cheese on top right before serving for that extra cheesy look. Enjoy!